This Area Covers a Wide-Variety of Hotspot topics
Most are driven on issues as Heard over the TG 31373
To add static talkgroups on the BrandMeister DMR network, log into your BrandMeister dashboard, select your hotspot and assign talkgroup IDs to a specific timeslot using the Static Talkgroups section.
Here’s a step-by-step guide to help you do it correctly:
🛠️ Step-by-Step: Adding Static Talkgroups on BrandMeister
- Log into BrandMeister SelfCare
Go to https://brandmeister.network/ and log in using your credentials (usually linked to your DMR ID). - Access Your Hotspot Dashboard
- Select “My Devices” on The Bottom Left
- Choose the Device
Select the hotspot you want to configure. - Locate the Static Talkgroups Section
- Scroll to the “Static Talkgroups” panel.
- Add Talkgroup IDs
- In the timeslot box, enter the numeric Talkgroup ID (e.g., 31373 for Eastern NC).
- Click the right-arrow button to add it as a static talkgroup.
- Repeat as Needed
- Add more talkgroups if desired, but limit to 2–3 per to avoid overloading your hotspot
- Save Your Settings
- Changes are usually saved automatically, but verify that your talkgroups appear in the list.
🧠 Tips & Best Practices
- Avoid Overloading: Too many static groups can cause missed transmissions or network congestion.
- Use TG4000 to Disconnect: To drop an active talkgroup, key up TG4000 as a group call.
- Auto-Static vs. Static: If you key up a talkgroup without setting it static, it becomes auto-static and stays active until timeout or replaced
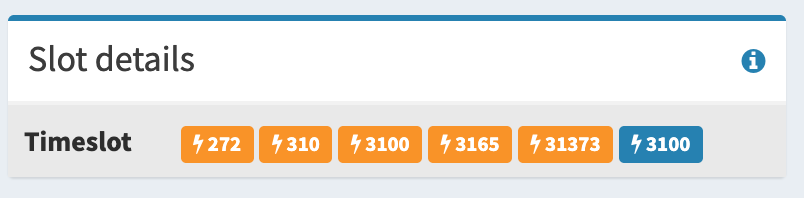
The Image Below is a Prime Example of Using TG 4000 to Disconnect BEFORE Moving to Another Talkgroup. This Scenario will have The TGs in Orange All Fighting against each other possibly causing you to Miss parts of your QSO. TG 3100 being in Blue is the Primary TG while the others are still connected and pass traffic though your HotSpot.
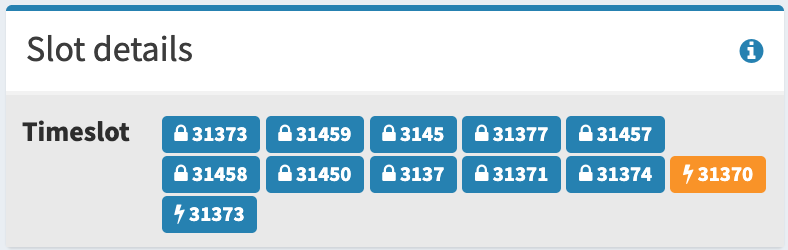
The Image Below is a Prime Example of Having too Many Talkgroups set as Full-Time(Static) as they will always attempt to pass traffic when there is Activity. TG 4000 will NOT work here since these are connected as Static! IF you are in a QSO with someone one 31373 and someone on 31459 keys up to ID you will miss part of your QSO on 31373 and Never know that someone keyed up on 31459 unless you have an RX group List setup in your radio, assigned to each channel!
🔢 How DMR IDs Work for Multiple Hotspots
The Following DOES NOT apply if you on run ONE Hotspot…Just use your 7- Digit ID normally
If you run more than one DMR hotspot (Pi‑Star, OpenSpot, etc.), each hotspot must use your main 7‑digit DMR ID plus a unique 2‑digit ESSID suffix.
This prevents loops, network blocks, and BrandMeister security issues.
✅ The Correct Format
Your personal DMR ID:
1234567 (example)
Add a two‑digit suffix for each hotspot:
| Hotspot | Correct DMR ID | Notes |
|---|---|---|
| #1 | 1234567 01 | First hotspot |
| #2 | 1234567 02 | Second hotspot |
| #3 | 1234567 03 | Third hotspot |
✅ Why Two Digits?
- A single digit (e.g., “1”) creates an invalid 8‑digit ID and can get rejected by networks1.
- Two digits ensures a valid 9‑digit hotspot ID every time.
✅ Additional Best Practices
- If you run multiple hotspots at home, use different frequencies and color codes so they don’t interfere with each other.
- If using BrandMeister, each hotspot must have its own ESSID and its own hotspot security password.
✅ Example Setup for You
Since you’re managing a big community and likely testing multiple devices, here’s a clean layout:
- Home simplex hotspot:
1234567 01 - Mobile hotspot:
1234567 02 - Backup / experimental hotspot:
1234567 03
This keeps everything clean, traceable, and network‑safe.
DMR Hotspots: Cellular Hotspot vs. Home Internet
DMR hotspots can connect to the network through almost any internet source. The two most common options are home Wi‑Fi and cellular hotspots. Both work well, but each has its own strengths and limitations. This guide explains the differences so operators can choose the best setup for their needs.
—
Using a Home Internet Connection
A home internet connection is the most common and stable way to run a DMR hotspot.
✅ Advantages
- Stable connection: Home broadband usually provides steady upload and download speeds.
- Low latency: Faster response times mean cleaner audio and fewer dropouts.
- Always on: Great for a fixed hotspot that stays online 24/7.
- Better for multiple devices: Your hotspot won’t compete with your phone or other mobile devices for bandwidth.
⚠️ Considerations
- Requires being within range of your home Wi‑Fi.
- Outages or router issues will take your hotspot offline.
—
Using a Cellular Hotspot
A cellular hotspot uses your phone or a dedicated mobile hotspot device to provide internet to your DMR hotspot. This is ideal for portable or mobile operation.
✅ Advantages
- Portable: Perfect for mobile, RV, camping, or travel use.
- Works anywhere with cell service: No need for home Wi‑Fi.
- Great for operators who want DMR on the go.
⚠️ Considerations
- Signal strength varies: Weak cell coverage can cause audio dropouts or disconnects.
- Higher latency: Cellular networks often have more delay than home broadband.
- Data usage: DMR doesn’t use much data, but long QSOs can add up.
- Battery drain: Running a hotspot from your phone can drain it quickly.
—
Which One Should You Use?
Choose Home Internet if you want:
- A stable, always‑on hotspot
- The best audio quality
- A fixed station setup
Choose Cellular Hotspot if you want:
- A portable or mobile DMR setup
- Flexibility to operate anywhere
- A backup connection when home internet goes down
—
Final Thoughts
Both connection types work well for DMR hotspots. Home internet offers the most stability, while cellular hotspots provide unmatched portability. Many operators use both — home internet for daily use and cellular data for travel or emergencies.